Free Hibiscus Crochet Pattern
Free Flower Crochet Pattern – Hibiscus
Skill Level
Beginner
Estimated Time
2.5 Hours
Pattern Type
Crochet Flower
Free Hibiscus Crochet Pattern
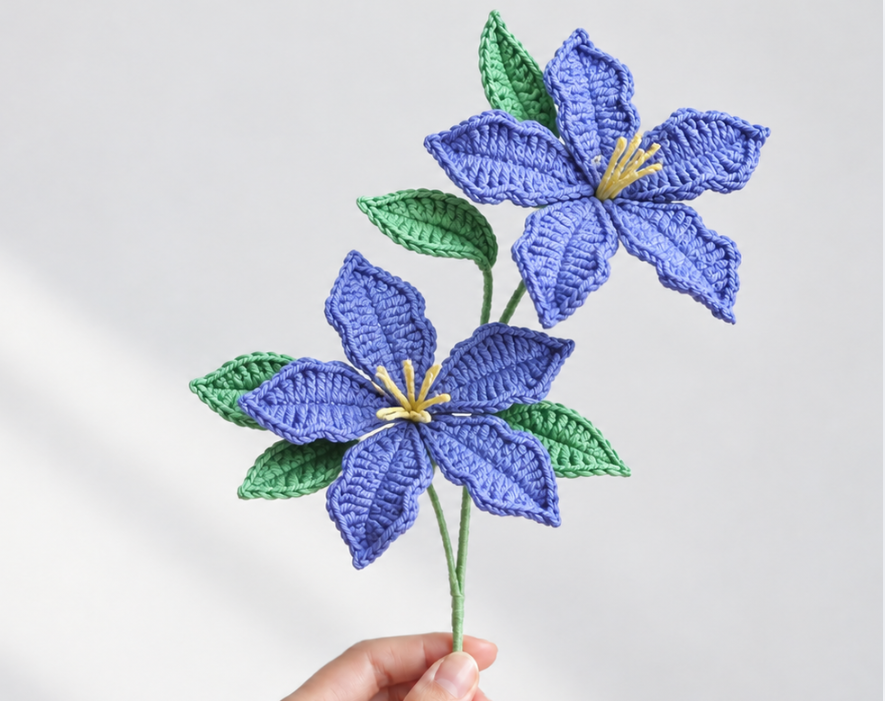
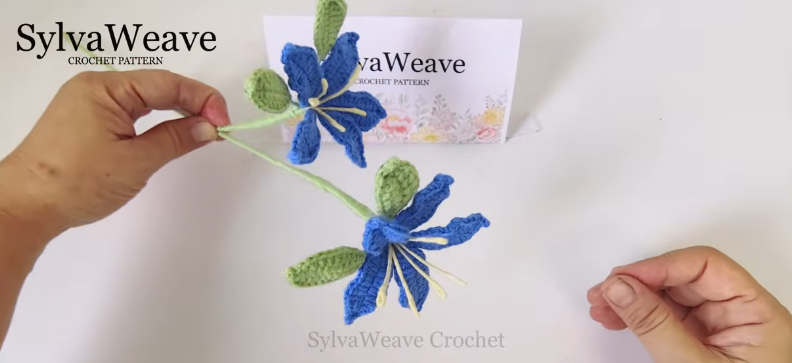
Create a lasting floral display with this free Hibiscus crochet pattern. Five shaped petals surround a bright yellow center, while wired green leaves and a yarn-wrapped stem complete the design. Make two flowers and arrange them at different heights for a graceful handmade stem.
This step-by-step tutorial includes the written pattern in US crochet terms, materials and tools, detailed photos, and a video tutorial. Follow along to crochet each petal and leaf, wrap the flower centers, and assemble your finished hibiscus. Choose your favorite flower color for a handmade gift or a floral accent for your home.
🌺 Pattern at a Glance
| Pattern Details | Information |
|---|---|
| Pattern Name | Hibiscus |
| Pattern Type | Crochet Flower |
| Skill Level | Beginner |
| Estimated Time | Approximately 2–3 hours for the two-flower stem; varies with experience |
| Crochet Terms | US Crochet Terms |
| Main Technique | Working around a foundation chain, increases, mixed-height stitches, wired petals and leaves |
| Construction | 10 petals, 10 flower centers, and 4 or 6 leaves; assemble 2 flowers on one stem |
| Finished Project | A stem with two five-petal hibiscus flowers |
| Best For | Floral arrangements, handmade gifts and home décor |
| Written Pattern | Included |
| Step-by-Step Photos | Included |
| Video Tutorial | Included |
| Hook Size | 2.5 mm (suggested; adjust to suit your yarn) |
| Yarn Type | 4-ply cotton yarn (suggested) |
The skill level and completion time are estimates. The hook size and yarn weight are suggested starting points; adjust them to suit your yarn and preferred finish.
🌻 About This Crochet Pattern
The petals and leaves are worked along both sides of a foundation chain with wire added for shaping. Make 10 petals and 10 flower centers, then use 5 petals and 5 centers for each flower. Make 4 or 6 leaves and attach the two flowers to a stem.
Please note: This pattern is for personal use only and may not be copied, shared, redistributed, or sold without permission from SylvaWeave. If you come across someone copying, sharing, or selling this pattern without authorization, please let me know at info.sylvaweave@gmail.com. As a thank-you for helping protect my original designs, I’ll be happy to send you a FREE SylvaWeave Flower Pattern.
🧶 Materials and Tools
- Flower-color yarn for the petals
- Green yarn for the leaves and stem wrapping
- Yellow yarn for the flower centers
- Suggested yarn: 4-ply cotton yarn
- Suggested crochet hook: 2.5 mm, or a size suitable for your yarn
- Wire for the petals and leaves
- Iron wire for the flower centers: ten pieces, each 6 in (15 cm) long
- A flower stem
- Scissors and wire cutters
- Hot melt glue and glue gun
You can browse yarn in the SylvaWeave shop. Different yarns and hook sizes will change the size, texture and structure of your finished hibiscus.
📖 Crochet Abbreviations
- ch — chain
- sl st — slip stitch
- sc — single crochet
- hdc — half double crochet
- dc — double crochet
- tr — treble crochet
- inc — increase
- hdc inc — work 2 half double crochet stitches in the same stitch
- dc inc — work 2 double crochet stitches in the same stitch
- st — stitch
- picot — picot
- FO — fasten off
- Rnd — round
When the instructions say “in the same stitch,” work the entire indicated group into that stitch. Follow the video for the small ch 1 picot at the petal and leaf tips.
🎥 Video Tutorial
Prefer to crochet along with me? Watch the complete step-by-step Hibiscus video tutorial below.
🌺 Free Hibiscus Crochet Pattern
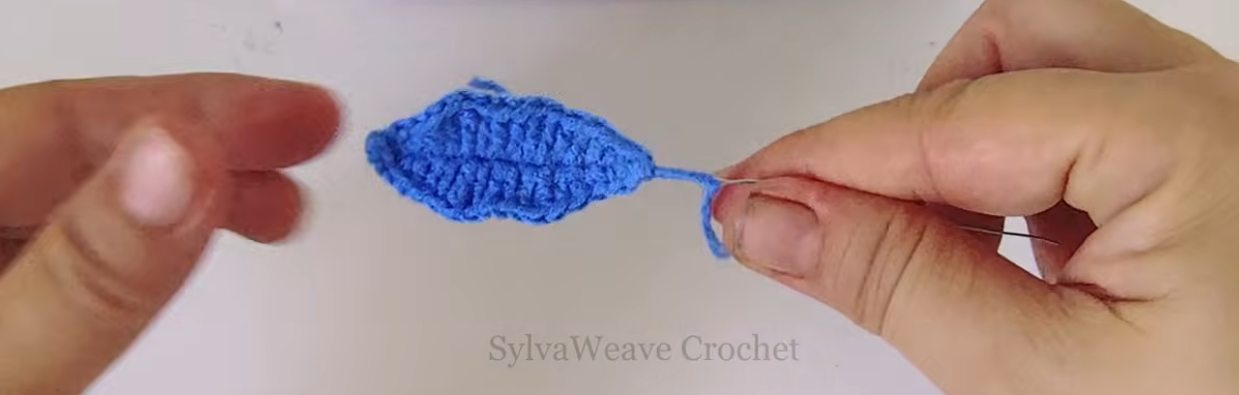
Flower Petals
Make 10 (5 petals to become a flower).
Using flower-color yarn.
- Rnd 1: ch 10, add wire, starting in 2nd ch from hook:
- Rnd 2: 2 sc, hdc inc, dc inc, hdc inc,
(1 dc, 1 tr) in the same stitch, (1 dc, 1 hdc) in the same stitch,
(1 hdc, 1 sc) in the same stitch.
Petal Tip: In the last ch, (1 sc, ch 1 picot, 1 sc).
Working along the opposite side of the foundation chain:
(1 sc, 1 hdc) in the same stitch,
(1 hdc, 1 dc) in the same stitch, (1 tr, 1 dc) in the same stitch,
hdc inc, dc inc, hdc inc, 2 sc, sl st, FO.
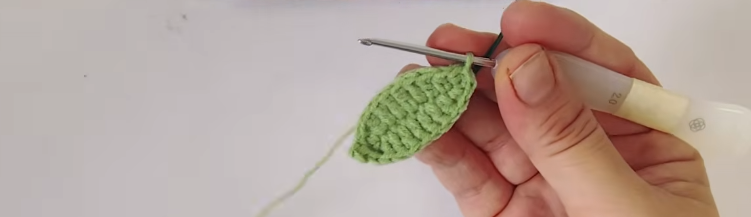
Leaf
Make 4 or 6.
Using green yarn.
- Rnd 1: ch 11, add wire, starting in 2nd ch from hook:
- Rnd 2: 1 sc, 1 hdc, 6 dc, 1 hdc.
Leaf Tip: In the last ch, (1 sc, ch 1 picot, 1 sc).
Working along the opposite side of the foundation chain:
1 hdc, 6 dc, 1 hdc, 1 sc, sl st, FO.
Flower Center
Make 10
- Cut 6 in (15 cm) iron wire.
- Wrap yellow yarn around the center (approximately 1 in / 2.5 cm).
- Fold the wire in half and align the ends. Continue wrapping with yellow yarn.

Flower Assembly
- Take 5 flower centers and attach 5 petals to form a complete flower. Wrap the flower with yarn to secure it.

- Add the leaves at your desired position. Continue wrapping the yarn all the way and secure it with hot melt glue.

- Take a flower stem and attach one flower to the top of the stem. Attach another flower at your desired position. Wrap the stem with green yarn to secure it in place.
Hibiscus Crochet Tips
- Keep your tension consistent so the five petals of each flower are similar in size.
- Shape the wired petals and leaves gently after crocheting.
- Arrange the petals evenly around the five flower centers before securing the wrapping.
- Wrap the green yarn neatly to cover the joins along the stem.
- Try different flower colors to complement your bouquet or home décor.
Share Your Creation
We would love to see your hibiscus flowers. Share your finished project on Instagram and tag @SylvaWeave.crochet.
More Free Crochet Patterns
Enjoy floral crochet projects? Try our Free Butterfly Ranunculus Crochet Pattern or Free Sunflower Crochet Pattern with Two Layers.
Pattern use: This pattern is for personal use only. Please do not copy, sell, share or redistribute the pattern. You may sell finished items made from it if you credit SylvaWeave as the pattern designer.